Setting up the API integration with your biometric machine for the first time is a crucial step to ensure seamless communication between your device and your server. This guide provides a comprehensive, step-by-step walkthrough to configure the server endpoint, link your biometric machine to the API, and validate the data flow.
Whether you’re a developer or a system administrator, this guide is designed to equip you with the tools and instructions needed to establish a stable and efficient integration. By the end, your biometric device will be successfully configured to transmit real-time data to your server and operate without errors.
Before proceeding with the configuration steps, please ensure that the following prerequisites are met. This will help ensure a smooth and error-free setup process.
Prerequisites
To ensure a seamless setup and integration process, please review and complete the following requirements before proceeding:
1. API Documentation (For custom Integration)
If you plan to integrate the biometric machine with your own custom software, it’s important to:
- Review the Biometric Web API Documentation
Go through the Biometric Web API Documentation to understand how the API works and its capabilities.
- Familiarize Yourself with Data Structures
Familiarize yourself with the Sample Request and Response Structures. This includes:- Callback URL Payloads: The format of data transferred from the biometric machine to your server via the callback URL.
- RESTful URL Payloads: The format of data sent from your server to the biometric machine through the RESTful API.
2. Server Endpoint (Callback URL)
For custom API integrations, ensure the following:
- A Functional Callback URL
This is the server endpoint where the biometric machine will send real-time attendance data.
- Network Accessibility
Make sure the callback URL is reachable either via the internet or your local network.
3. Biometric Machine Readiness
Before configuration, confirm the device is set up and ready for integration:
- Device Availability
The biometric machine should be on-site and physically accessible.
- Network Connectivity
- Power on the device.
- Connect it to the network via LAN or Wi-Fi.
- Ensure it is online and can communicate with your server.
4. Pre-Integrated Platforms
If you are integrating the biometric machine with platforms such as Zoho, Bayzat, OrangeHRM, PalmHR, Razorpay, ERPNext, SAP, Odoo, or similar:
- Preconfigured Callback URLs
No need to manually configure the callback URL—these platforms handle it for you.
- Automated Data Handling
Data formats and transfers are automatically managed by the respective integrations.
This approach significantly simplifies the setup process for supported platforms.
By ensuring these prerequisites are met, you’ll be well-prepared for a smooth and efficient biometric integration—whether you’re working with a custom system or a third-party platform.
Lets Get Started
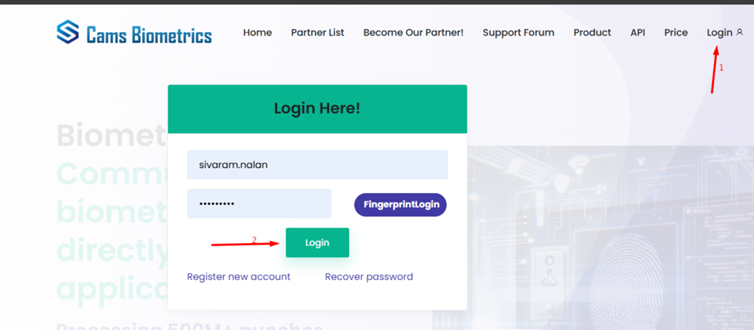
Login into https://Camsbiometrics.com
Device Status Dashboard Overview
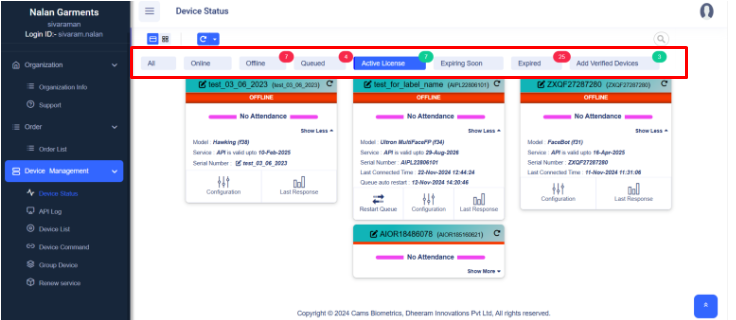
After a successful login, the Device Status Dashboard provides users with an overview and control panel for managing biometric devices.
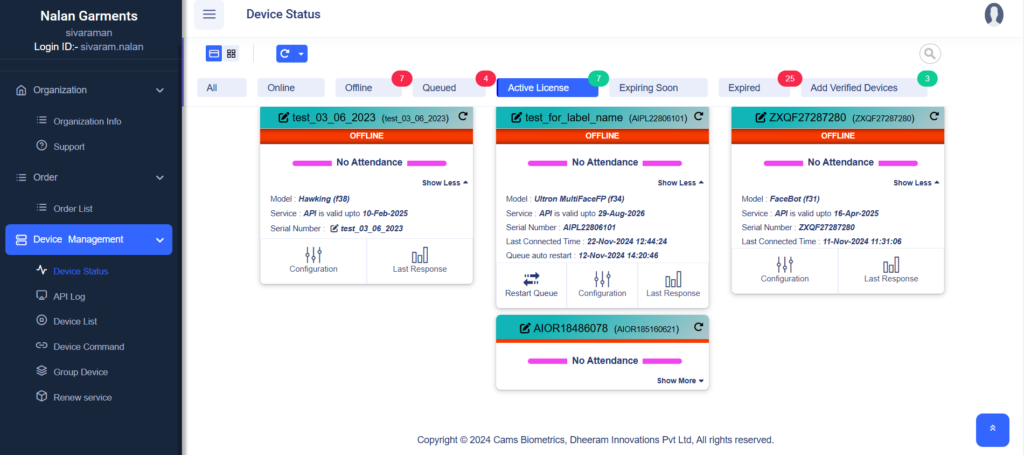
1. Two views of device card
2. Device Status Summary
This section gives you a high-level overview of all devices linked to your organization.
- Key Features:
- Status Filters:
Easily filter devices based on their current state:- All: View all registered devices.
- Online: Devices that are actively connected.
- Offline: Devices that are currently unreachable.
Refer https://forum.camsbiometrics.com/how-to-bring-the-cams-biometrics-machine-online/ for resolving any connectivity issue in the hardware. - Queued: Devices with pending actions.
- Active License: Devices with valid licenses.
- Expiring Soon: Licenses nearing expiration.
- Expired: Licenses that need renewal.
- Add Verified Devices: Shortcut to add new verified devices.
- Status Filters:
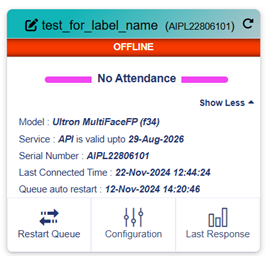
- Device Cards:
- Each card represents a single biometric device, displaying its key details and status.
- Buttons like “Renew Now” allow for quick license renewal for the expired or getting expired devices
- Status indicators such as No Attendance, Offline, or Inactive provide insights into the device’s functionality.
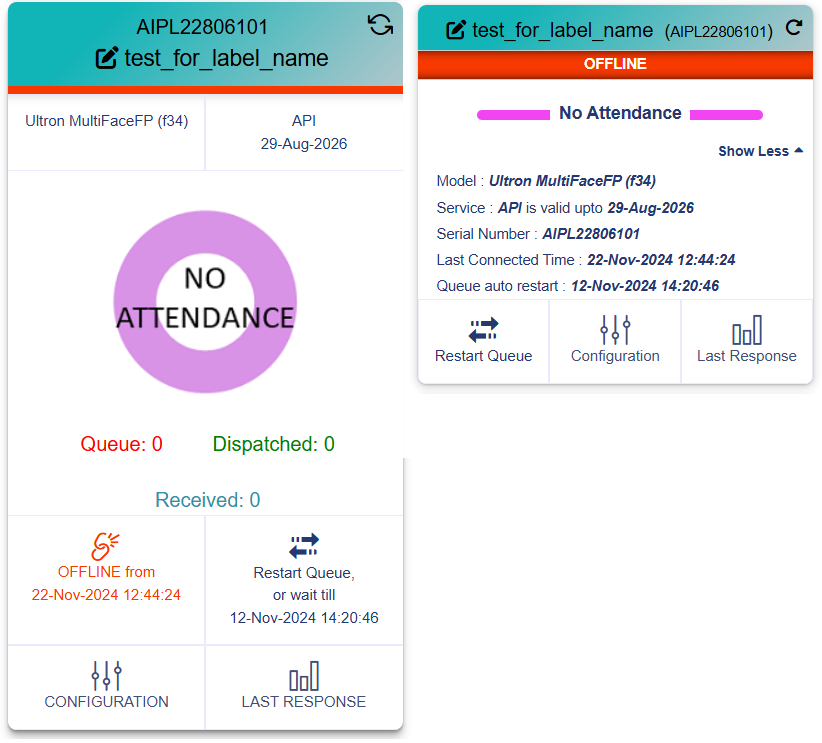
3. Individual Device Details
Each device card provides real-time insights and configuration access.
- Device Info:
- Label & Serial Number for identification
- API Service Validity Date
- Model Type and Last Connected Time
- Status Indicators:
- No Attendance – No punch data has been captured.
- Offline – Device isn’t currently reachable.
- Queue/Dispatched/Received Counts – To monitor punch flow
- Available Actions:
- Restart Queue – Triggers the queue to push data immediately.
- Configuration – Adjust time zone, direction, callback URL, etc.
- Last Response – View last server response to debug issues.
- Renew Now Button:
- Allows users to quickly renew device licenses when required.
4. Advanced Device Management
For administrators managing multiple devices, the dashboard offers:
- Key Features:
- Detailed Status Updates:
- Last connected time, license status, and API configurations.
- Devices grouped by their current operational states (e.g., Offline, Expired).
- Additional Options (Show More):
- Clicking on “Show More” expands to display more detailed device information or configuration options.
- Bulk Actions:
- Renew or configure multiple devices directly from this dashboard.
- Detailed Status Updates:
Sidebar Navigation

- Organization Section
- Organization Info: View and edit company profile
- Support: Raise support tickets for troubleshooting
- Order Section
- Order List: Track and manage device/license purchases
- Device Management Section
- Device Status: shows device connectivity status like online or offline, last connected time and license validation it helps you to know your device status.
- API Log: Shows all your attendance data, which helps you verify whether the data has been successfully pushed or not on a daily basis. The log displays data for the last 30 days only.
- Device List: displays all registered devices along with their service tag ID, expiry dates, and associated client information. It helps you monitor device licenses and manage renewals efficiently to ensure continuous service.
- Device Command: Use this page to execute commands on your biometric devices. Select the device (Service Tag ID), and the command you want to run. Commands usually take 30-60 seconds to complete, so please ensure the device remains online during execution.
Available Commands:- Resend All User Data: Resends the complete user data to the selected device.
- Resend Attendance Logs: Resends attendance logs from the device.
- Add User: Adds a new user to the device.
- Delete User: Removes a user from the device.
- Clear All Admin Rights: Removes all administrative privileges from the device.
- Group Device: This page allows you to manage groups of devices under your account. You can view and organize device groups, add new groups, and see details like group names and the devices included. Using group devices, you can sync all the devices within a group for efficient and streamlined management.
- Renew Service: This page allows you to manage and renew services associated with your inactive devices. You can view the list of devices with inactive services, check service details and easily renew services by toggling the “Add” option. The interface supports searching and pagination to efficiently handle multiple devices and service renewals.
How to Use the Dashboard
The Cams Biometric Dashboard is built to simplify and enhance device management. Here’s how you can make the most of its features:
- Monitor Device Health:
- Use the status filters (e.g., Offline, Expired Licenses) to quickly identify devices that require attention.
- Easily spot devices with license issues, connectivity problems, or inactive status.
- Perform Essential Actions:
- Click Renew Now to instantly renew licenses for devices that are expiring or have expired.
- Use Show More to access detailed configuration settings and perform advanced actions on individual devices.
- Access Device Logs:
- Navigate to API Log and Device List to monitor API interactions, review device communication history, and troubleshoot issues effectively.
- Manage Device Groups:
- Use the Group Device feature to organize devices based on branches, departments, or custom groupings for better control and clarity.
- Restart Device Queue:
- Check the Last Response to ensure the server is returning a valid response as per the API specifications.
- If the issue is resolved, click Restart Queue to immediately resume data transmission. Alternatively, wait for the next automatic queue restart as scheduled.
The dashboard is designed to streamline device management, providing users with quick actions, insights, and advanced tools to maintain optimal operation. Let me know if you’d like to expand on any section or add a walkthrough!
Configuration Page Overview
This page enables you to configure and optimize your biometric device for seamless integration with the server. Below is a detailed breakdown of the essential sections and settings available for setup
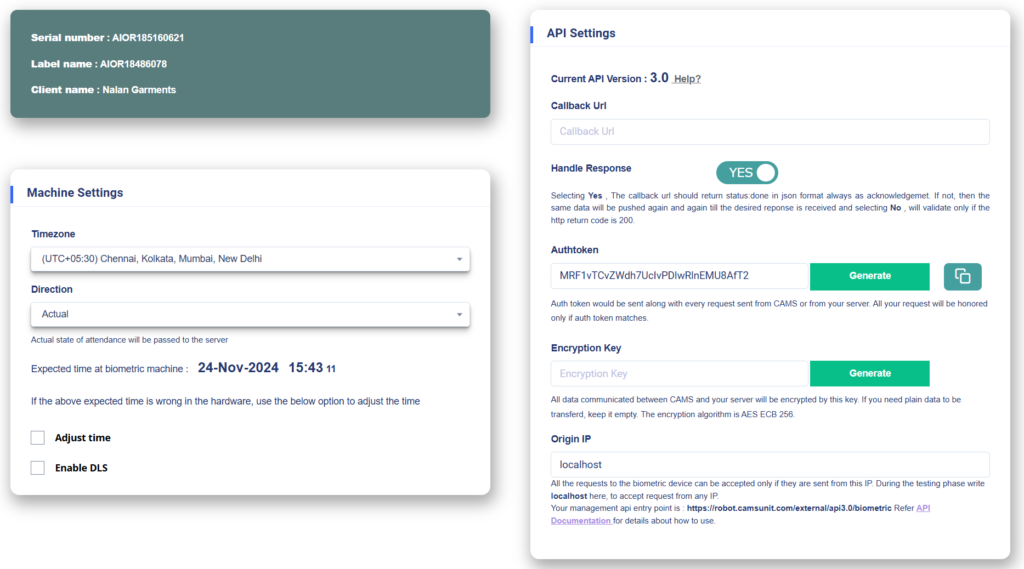
1. Device Information Panel (Top Left)
- Serial Number:
- Identifies the unique serial number of the biometric device.
Example:AIOR18510621.
- Identifies the unique serial number of the biometric device.
- Label Name:
- The custom label or name assigned to the device for easier identification.
Example:AIOR18486078.
- The custom label or name assigned to the device for easier identification.
- Client Name:
- Displays the name of the client or organization associated with the device.
Example:Nalan Garments.
- Displays the name of the client or organization associated with the device.
2. Machine Settings (Bottom Left)
Defines fundamental configuration parameters for the biometric device.
- Time zone:
- Select the appropriate local timezone for accurate timestamping of attendance data.
- Example:
(UTC+05:30) Chennai, Kolkata, Mumbai, New Delhi.
- Direction:
Controls how attendance entries are interpreted and transmitted to the server
Directions Mode:- Actual: Use when precise attendance states are needed without modification.
- IN/OUT: Use when only one type of state (e.g., entry or exit) needs to be tracked.
- Break IN/OUT: Ideal for managing specific events like breaks.
- First is IN, Rest are OUT: Simplifies attendance data for single-shift environments.
- Zigzag: Suitable for controlled environments with alternating entries and exits.
These options provide flexibility to meet various business or organizational requirements.
- Expected Time:
Displays the current time configured on the biometric device. (Example:24-Nov-2024 15:40)- If the time on the biometric device appears incorrect even after selecting the appropriate time zone:
- Adjust Time: Use this option to synchronize the device’s clock with the server time.
- Enable DLS (Daylight Saving Time): Turn this on if your region observes daylight saving time to ensure accurate time tracking.
- If the time on the biometric device appears incorrect even after selecting the appropriate time zone:
3. API Settings (Right Panel)
Used to configure communication between your device and your server for real-time attendance data transmission.
Callback URL
- Purpose: Defines the server endpoint where attendance data will be pushed.
- Input Field: Enter your software/server’s Callback URL to receive logs.
Handle Response
- YES: Requires a JSON response ({status: “done”}) from your server to confirm successful data receipt. If not returned, the system retries every 3 hours.
- NO: Assumes success if the HTTP status code is 200, without validating the message body.
Auth Token
- Purpose: Ensures secure communication via token-based authentication.
- Actions:
- Click Generate to create a new token.
- Use Copy to retrieve and store it for server-side integration.
Encryption Key (Optional)
- Purpose: Encrypt communication using AES ECB 256-bit encryption.
- Input Field: Enter a custom key if encryption is required, or leave blank.
Origin IP
- Purpose: Restrict access to the device to a specific IP address.
- Input Field: Use localhost during testing or specify the server’s public IP in production.
Management API Endpoint
- Details: Lists the API endpoint used to manage the device.
- Reference: A link to the API Documentation for additional details on endpoint usage.
Steps to Configure
1. Set Time zone
- Select the appropriate time zone based on your local time.
2. Choose Attendance Direction
- Set the attendance direction according to your organizational requirements.
3. Adjust Time (if needed)
- If the device’s internal clock is incorrect, use the “Adjust Time” option to synchronize it.
4. Configure the Callback URL
- Enter the server endpoint that will receive the attendance data.
5. Enable Handle Response
- Enable or disable this option depending on whether your server can return acknowledgment responses.
6. Set Up Secure Communication
- Generate and use an Auth Token.
- (Optional) Enable encryption by setting an Encryption Key.
- Specify the Origin IP to restrict access and enhance security.
7. Update Settings
- Click Update, then click OK to save the changes.
Note: Verify that the selected time zone is reflected on your device. If not, perform Step 3 to adjust the time.
8. Verify Device Status and API integration
- Confirm that your device is online under the Device Status page.
- If it is not online, please refer this link https://forum.camsbiometrics.com/how-to-bring-the-cams-biometrics-machine-online/ to bring your device online.
- Once the device is online, add a test user and perform a attendance punch on the machine.
- Now, navigate to Device Management > Device Status and check the Last Response to view the most recent response received from the server.
- Wait 30 seconds, refresh the page, and check if the Last Response shows “Status:Done”.
- You can now begin recording attendance and check the reports.
- If reports are not visible in your software, check the Last Response section for any error messages and resolve them accordingly.
9. Support
If you have any questions or encounter any issues with the above steps, please raise a support ticket at camsbiometrics.com. Navigate to Organization – > Support to submit your request. Our team will address your queries promptly.